Upcoming Events

Collapse

There are no results that meet this criteria.

Announcement

Collapse
No announcement yet.

Doubts (public) Developmental log

Collapse
X
 
  • Filter
  • Time
  • Show
Clear All
new posts

  • #91
    I was thinking about that demo the other day! Yes, I should finish it. Rather than Zbrush tho I may look at doing it in Substance Painter or NDO/DDO (grab the free beta while you can) because they're a bit cheaper and Powerful enough for nwn2 repaints without the fuss of needing to match zbrushes sculpts to the mesh.

    May take a little while tho, I'm in the middle of a protracted house move and then have a pretty crazy couple of weeks after that!
    It is the greatest of all mistakes to do nothing because you can only do a little - Do what you can.
    Sydney Smith.

    Comment


    • #92
      Where does one acquire these 'betas', or is it just the highly non-visible "Download DDO/NDO" from the Quixel site?

      Frazer Mfg. is a department of Frazer Fabrications, focused on the construction of high-end custom-crafted equipment and gear.
      Also part of Frazer Fabrications are:
      Frazer Armories - focused on resale of prefabricated arms and armorments;
      Frazer Merchantile - specialising in economic analysis and scaleable logistics; and
      Frazer Laboratories - the leading independent R&D for sundrite theory, arcane and mechanical engineering


      James Frazer: Anthropological Gearhead, Techsmith, Arcanaphysisist, Renown Proprietor
      AKA: Artifax Grade B Exigo Corporation Syndicated Associate VP, Professor, Quartermaster of the Schild Whurest-ExiCorp Joint-Operations Facility, and 'Annoying Mechanist'
      Theme: Stil Alive

      Grid vs. Squeegle, not Good vs. Evil

      Distances and travel-times for the Sunderian Peninsula:Free Version 1.0

      Crafting changes are a dead-horse topic, but feel free to ask me about crafting: If I can't answer it, I bet I can direct you to someone who can.
      To those who are interested in making or have crafting-oriented characters, please check out the Fabricator's Collective and how to get FC-certified.
      crafting tutorial.

      Unfortunate truths:
      Intention: [DM > Crafting > Faction Store > Drop > Regular Store]
      Reality: [DM > Faction Store > Drop > Regular Store> Crafting]

      Comment


      • #93
        Ah, the beta may have stopped. They used to be rather song and dancey about the freeness of it. Bit of a pain in that case, but you could just try downloading it I guess.
        It is the greatest of all mistakes to do nothing because you can only do a little - Do what you can.
        Sydney Smith.

        Comment


        • #94
          https://renderman.pixar.com/view/PR-NCR

          Not sure if this is of any interest to you or not, but I saw it today.
          Originally posted by Saulus
          Stop playing other shitty MMOs and work on Sundren, asshole.

          Comment


          • #95
            Wow, that's cool. Been years since I've used renderman!

            Stuck with Maya LT rather than a full suite ATM tho, so just pbr and no external renderers. Still grab it though just in case

            Thanks for the link, its great!
            It is the greatest of all mistakes to do nothing because you can only do a little - Do what you can.
            Sydney Smith.

            Comment


            • #96
              OK, so… A basic tutorial in retexturing stuff for NWN2, for the creation of shiny new stuff goodness. Appologies if it’s a little basic, I just wanted to cover all my bases.

              1. The Intro.
              Each model that’s displayed in game is made up of a few parts, for the purpose of this tutorial we’ll be looking at one of the pieces of armour that shipped with the game way back in the day.

              The armour we’ll use if located in the Models.zip in the Data folder of your NWN2 installation, probably located here: *drive*:\Program Files (x86)\Atari\Neverwinter Nights 2\Data but maybe somewhere else depending on you.

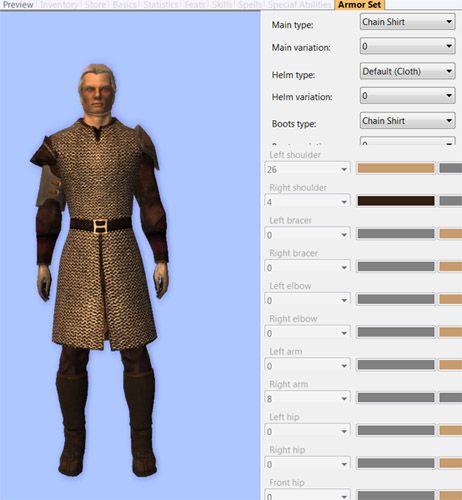
              The armour we’ll use as a base is the 1st of the Chain Shirt choices, why? Well, it’s a nice simple canvas for us to get our doodle on, plus it’s the sort of shape that lends itself to a variety of uses from gambesons, surcoats, chainmail, leather or court wear. It’s already used again in the engine as the basic Leather option.


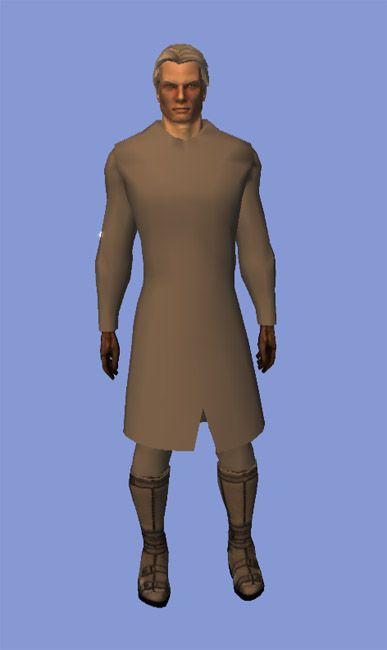
              This is what we'll be poking.

              Located in the models.zip is the model for the armour, its textures are located in Materials.zip

              Stuff you may or may not need.
              Exactly what you need or want will depend on the methods you want to use, but some or more of this lot will be handy:

              Barrel of Monkey’s awesome tutorial – It’s what got me into doing stuff for NWN2 and is really handy for both basic information as well as much more detail on the filenames and structures than I’ll go into here.

              Image Editor – There are tons of these out there, choose your favourite. Personally I use CS2 but it doesn’t really matter that much, just whatever works for your. You’ll definitely need something though.

              Some kind of 3D software – Again, there are many of these around. Personally I’m a Maya man (cheap LT license, though there are no NWN2 tools for it) though Blender does well for a great many people.

              MDB/OBJ conversion tools - from game to software! - We need these to convert the existing game models into a format that our high-poly package can understand. Grab these off the vault here.

              DDS tools - software to game textures - If you're not using a later version of photoshop or your image program doesn't have DDS support built in then you'll need these. Various converters are available but I use the nvidia plugins and have DDS Converter 2 installed as well.

              .hak packer - Package up your finished work - Once everything is done it needs to be made into a .hak for use, there are a couple of packages available but I tend to use NWN2Packer.

              Lots of tools and variants can be found on the Vault including various plugins for 3d software, hak tools and 2da editors: http://neverwintervault.org/category/tool

              Options:
              High Poly Modelling / Sculpting stuff – If you plan on making new models or really overhauling older ones then you’ll most likely need a highpoly modelling/sculpting package. I use Zbrush but there are many out there. Many 3d apps come with them built in these days, including Blender if you’re using that.

              Normal Mapping software - make them normal maps! - Xnormal is the go-to app for baking out normal maps from high poly to low poly models. If you’re sculpting something you can use this, though there are other packages that’ll do the same thing.

              Fancy other software - Painting software like Substance Painter or DDO/NDO can also be useful for painting up new models without having to worry about fiddly sculpting. We’ll have a look at that later.
              It is the greatest of all mistakes to do nothing because you can only do a little - Do what you can.
              Sydney Smith.

              Comment


              • #97
                2. Filenames & Files

                Model
                This is where you’ll encounter the first of the idiosyncrasies of the wonderful Aurora Engine. The model numbers you’ll find in the Models.zip. You’ll need to add 1 to the number located in the toolset to get the model number, so while we’re looking at Chain Shirt 0 in the toolset, we actually want the model chainshirt 01.

                The file we want is named thusly:
                P_HHM_CH_Body01.MDB

                P - This signifies what catagory of thing the model is for, P = Player, N = NPC, C = Creature, A = Armour/Accessory

                HH - This section tells you what race the part belongs to, our focus here is main armours so it’s just body types. The first two letters tell you the race, AA = Halfling (accessories/hats/heads only) DD = Dwarf, EE = Elf, GG = Gnome, HH = Human (inc Halfling bodies, planetouched etc), OO = Half Orc.

                M - The last letter signifies the items gender, M or F.

                CH - This section tells you what category the armour is in the toolset. CL = Cloth, CP = Padded, LE = Leather, CH = Chain, SC =Scale, PF = Plate, HD = Hide, NK = Naked. You can make your own categories but this will involve some changes to 2da’s which are ideally avoided unless you really need a unique category.

                Body – What type of thing the model is. Body, Helmet, Boots, Gloves, etc.

                01 – index number. This needs to be unique within its category, and will be how the armour is selected in the toolset (remember this will be at -1 in the toolset, so armour 1 becomes 0, 80 is 79 and so on)

                Copy this model out to a working directory somewhere and then we’ll find the textures.

                Texture
                The textures are located in the NWN2_Materials.zip file. It’s worth noting as you scroll through that there are a lot less files for tetures than models, especially with the subraces. This is because most of the racial models use the human texture for their armour. Half Orcs are the largest exception to this and often use different models in addition to different textures.

                There are three files that the engine uses for the model we want, they’re named:

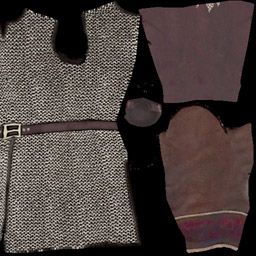
                P_HHM_CH_Body01.DDS – the RGB channels of this texture are the diffuse colour map, while the Alpha channel is Transparency map.

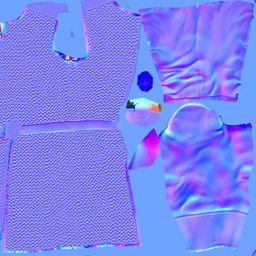
                P_HHM_CH_Body01_N.DDS – the RGB channels are the normal map, the Alpha channel is the Specular/Reflectivity, white for high-gloss shine and black for utterly matt.

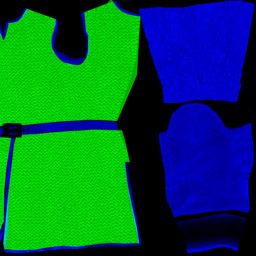
                P_HHM_CH_Body01_T.DDS – Tint Map, RGB channels are the tintable sections of the map, allowing custom colours to be used. For armours Red (tint 1) isn’t user selectable and is shown as the skin-tone of the player character (for instance, see the cloth armour I did ages back, the braiding on the jacket will be the skin-tone of the wearer, a cheeky feature) Green (tint 2) and Blue (tint 3) are as selected in the toolset. For non-armour pieces all 3 values are tintable. You can blend between the RGB values to create tints, so if you want to simulate contrasting areas of thin material overlapping with each other or skin you can. It’ll certainly help with readability for some fabrics (lace, gauze, thin cotton etc). The Alpha channel dictates if something is tintable or not (Full tint white to no tint Black).

                If the model had the optional luminance map it would be called:

                P_HHM_CH_Body01_I.DDS – This allows you to add glowy stuff. This map is HSV (Hue, Saturation, Vale) rather than RGB. Hue and Saturation set the colour while Value gives you the brightness at which it glows.

                Once you’ve located the three textures we need, copy them to the same working directory as the model.


                Tip: If you’re just working on a texture for an existing model the quickest way to check the textures is to copy them to the override directory with their existing filenames, then you can just pop into the toolset or the character creation screen and see if they’re working properly or not without having to pull in custom haks or load up specific modules.

                Opening the textures up shows us how they work (shown here at ½ size):


                P_HHM_CH_Body01.DDS – RGB, the models diffuse colours. All matte and basic with no shadowing. It’s clear from this texture that the texture is mirrored on the model, worth keeping in mind when we come to repaint this as it means no writing or singly placed logos. With no transperancy the alpha chanel is pure white, so no point showing it.


                P_HHM_CH_Body01_N.DDS – RGB, The normal map gives us all the folds and self shading information, lots of folds around the knee (upper RH part) and the texture of the chainmail.


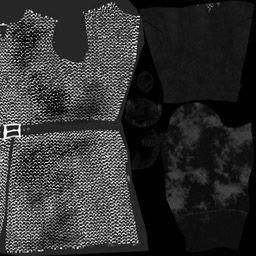
                P_HHM_CH_Body01_N.DDS – Alpha, the reflection / specular map. Here the white value of the chain and belt buckle is clear, the metal is all shiny while the leather of the arms and legs is much more matte, though with some patchy spec highlights. Some noise has been added to the chain under the arms to make it feel a bit dirtier and lived in.


                P_HHM_CH_Body01_T.DDS – RBG, as there is no skin on the chainmail Red/Tint1 isn’t used. The other two channels are clearly set out, Green/Tint2 covers the whole of the metal area, allowing people to set what colour they want that to be while the leather is covered by Blue/Tint3 allowing people to shift that slightly (though not by huge amounts, the tint maps are addative, so they won’t replace the original brown of the leather, just add the colour of the tint to it). The Black sections of the map are untintable. However….


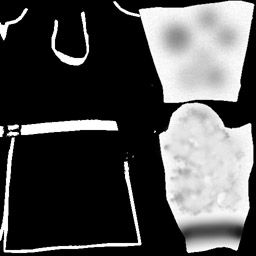
                P_HHM_CH_Body01_T.DDS – Alpha, here we can see that the tint functions have been limited purely to the leather areas of the map, so even though the metal area is set to be Green/Tint2 the alpha channel being black there means that no changes will take place. On the arms and leg sections the grey noise allows for more variation in the tint, meaning more of the original colour will come through in the darker patches for a more natural look.
                It is the greatest of all mistakes to do nothing because you can only do a little - Do what you can.
                Sydney Smith.

                Comment


                • #98
                  Originally posted by Kitsunestume View Post
                  Where does one acquire these 'betas', or is it just the highly non-visible "Download DDO/NDO" from the Quixel site?
                  The legacy versions of DDO and NDO are apparently free these days, they can be found on the bottom of their product pages over at Quixel.se.
                  It is the greatest of all mistakes to do nothing because you can only do a little - Do what you can.
                  Sydney Smith.

                  Comment


                  • #99
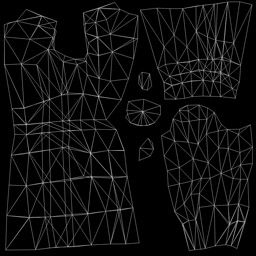
                    One thing I didn't mention in Textures - If you're painting a new texture in photoshop or that kind of software it can be really helpful to get an image of the models UVs to overlay while you work. This can be a real boon when placing seams, hems and border details.

                    To do this, first convert the model you grabbed to an .obj using the MDB2OBJ tools linked in the first tutorial post, open the obj up in your 3d package of choice then in the UV menus you should be able to export a UV snapshot.

                    That'll give you an image something like this:


                    Overlaid onto the original textures it'll make placing details accurately much, much easier.
                    It is the greatest of all mistakes to do nothing because you can only do a little - Do what you can.
                    Sydney Smith.

                    Comment


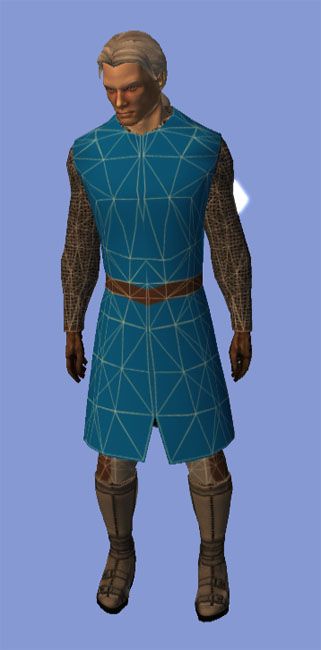
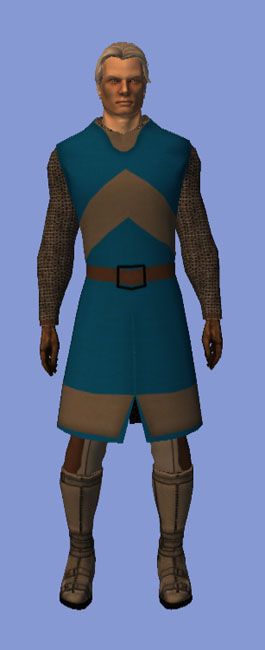
                    • Blimey, it's taken a while. Sorry about that, such is life!

                      Still, a few minutes today to do some simple photoshoping!

                      Right, before you start making what you want it's a good idea to make a blank slate so you can easily see what's what on the model.


                      Here I've filled the normal map with the neutral normal colour of 128,128,255, filled the diffuse map with a 30%ish grey and blacked out the normal map's alpha to remove the specularity.


                      Using the UV snapshot to assist in placements.
                      The chainmail is just a (poorly) tiling texture I found thrown over the arms, the body is just a plain colour block with a cloth texture overlayed. No spec or normal yet.


                      Few more tweaks and without the UV snapshot. The blue and grey sections will be split into tintable sections later on so the jerkin can be shaded to suit whoever it's for.
                      It is the greatest of all mistakes to do nothing because you can only do a little - Do what you can.
                      Sydney Smith.

                      Comment


                      • Nothing to add except a thought for the day.

                        "When you think to yourself 'it's about time I saved this', save it. Don't decide to just finish this one little thing before saving."

                        Twice. Son of a.....
                        It is the greatest of all mistakes to do nothing because you can only do a little - Do what you can.
                        Sydney Smith.

                        Comment


                        • Started using Marvelous Designer, by the power of Grayskull that's some good stuff right there.

                          Just, wow. Much nicer results than sculpting by hand and easy to use, if you're even vagually interested in doing clothing or cloth/leather accessories then check it out. It's on Open Beta till the launch of the new version, so try it for free while you can.

                          Come pay day I'll be throwing some money at it.
                          It is the greatest of all mistakes to do nothing because you can only do a little - Do what you can.
                          Sydney Smith.

                          Comment


                          • An important life lesson..

                            Unless you really enjoy suffering or are very very rich (and happy to spend it all) DO NOT go to Venice if you have or are any of the following:

                            A child in a pushchair or pram.
                            Pregnant.
                            Elderly or infirm.
                            A wheelchair user.
                            A fear of crowds and/or street performers.
                            A fear of cheap (or very expensive) masks.
                            It is the greatest of all mistakes to do nothing because you can only do a little - Do what you can.
                            Sydney Smith.

                            Comment


                            • Perfect example of how female armour should look.

                              https://www.artstation.com/artwork/ZPgOX

                              Though that booted leg does look a little awkward.
                              It is the greatest of all mistakes to do nothing because you can only do a little - Do what you can.
                              Sydney Smith.

                              Comment


                              • Originally posted by Doubtful View Post
                                Perfect example of how female armour should look.

                                https://www.artstation.com/artwork/ZPgOX

                                Though that booted leg does look a little awkward.
                                I want that for my barbarian. So badly.
                                Aesa Volsung - Uthgardt Warrior

                                Formerly
                                Gabrielle Atkinson - Mage Priest of Torm
                                Anasath Zesiro - Mulhorandi Morninglord
                                Kyoko - Tiefling Diviner
                                Yashedeus - Cyrist Warlock
                                Aramil - Nutter

                                GMT -8

                                Comment

                                Working...
                                X